
Review Output Function
Expresso offers peace of mind with its Review Output function, which lets you do a final proofing of any document, including specific records from a data file, and modify or cancel it if needed. We encourage all new clients to use this “safety valve” as they familiarize themselves with Expresso, and for veteran users, it’s especially helpful when implementing new programs.
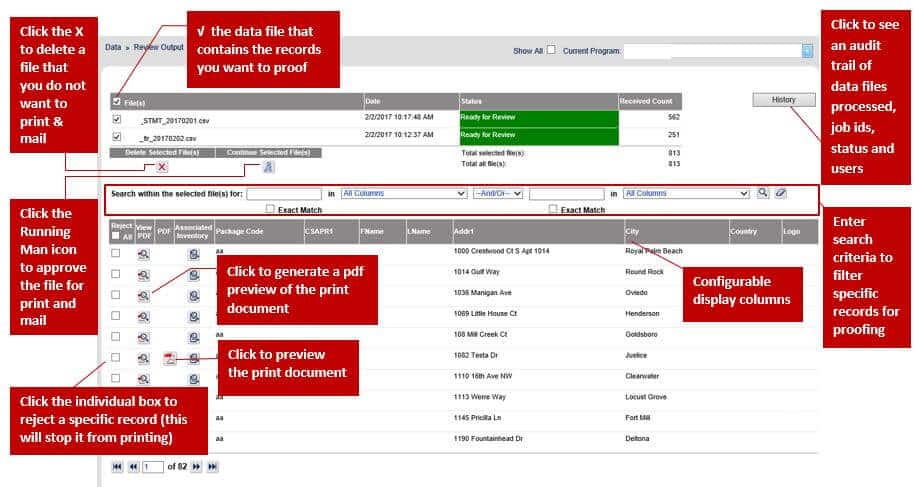
Review Output lets you:
- Select a specific record or multiple records from the data file processed to review.
- View a PDF of the selected document(s).
- Make content revisions if needed.
- Verify that data fields are mapping correctly to the document.
- Resolve data concerns by searching specific data fields, rejecting any problematic individual records without having to reprocess the entire file.
Once you’ve adjusted your content and/or data records, you can approve the job for production. Contact your CSM to elevate approvals to make your changes live and then refresh the PDF to see your changes. You also can create an audit trail, using the history feature that includes the user name, date and time stamp of files previously approved.
How it works
First, contact your Nordis client services representative to turn on or off the Review Output functionality for your program in Expresso.
Once it’s enabled, the Review Output function is found under the data tab on Expresso’s home screen. When you click Review Output, you’ll see a list of data files and a column to the left that has individual boxes you can check for the data file(s) you want to review. The system will produce a PDF rendering of the sample document.
A grey bar in the middle of the screen lets you display any fields received in your data. You also can search by up to two fields, such as city and zip code, displayed on the screen in the grey bar.
When reviewing, you can check and uncheck the listed files as many times as you need to find the documents you want to review. To change pages, you can use the left and right arrows or type a number into the text box and hit enter on your keyboard.
The grey bar has a box to check if you want to reject all the documents. If you want to reject some of them, a column on the left side has boxes where individual documents can be checked.
If you want to delete the entire file, then select the box next to the file name and click on the “Delete Selected File(s)” button.
If everything’s OK, you approve the file for output for printing by simply clicking on the running person icon under the tab “continue selected file(s). You also can “continue” multiple files to create one processing job.